In the era of digital introductions and virtual handshakes, the importance of a well-crafted ID picture extends beyond mere protocol; it becomes a gateway to leaving a lasting impression. Your digital avatar is your initial encounter with the professional world, a visual handshake before you even exchange words. It’s the face you present to potential employers, colleagues, and the vast online community that defines your personal and professional identity. Harnessing the power of this visual representation grants you the opportunity to go beyond the ordinary and make a memorable statement.
Whether you’re navigating the landscape of professional networking, venturing into the job market, or simply curating your online presence, the ability to curate your visual narrative is inherently empowering. In this comprehensive guide, we embark on a journey through the nuanced art of crafting your personalized ID photo using the versatile tools of Adobe Photoshop.
Regardless of whether you’re a newcomer to the realm of Photoshop or a seasoned user, each step has been meticulously tailored to ensure not only efficiency but an enjoyable and empowering creative process.
A Step-by-Step Guide on How to Creating Your Own ID Picture
Let’s delve into the intricacies of Photoshop, unlocking its potential to transform a simple image into a powerful representation of your identity—one that not only meets the standards but surpasses them, leaving an indelible mark on those who encounter it. Get ready to embark on a journey of visual storytelling, where your ID picture becomes a testament to your creativity, professionalism, and the unique essence that sets you apart in the digital tapestry of first impressions.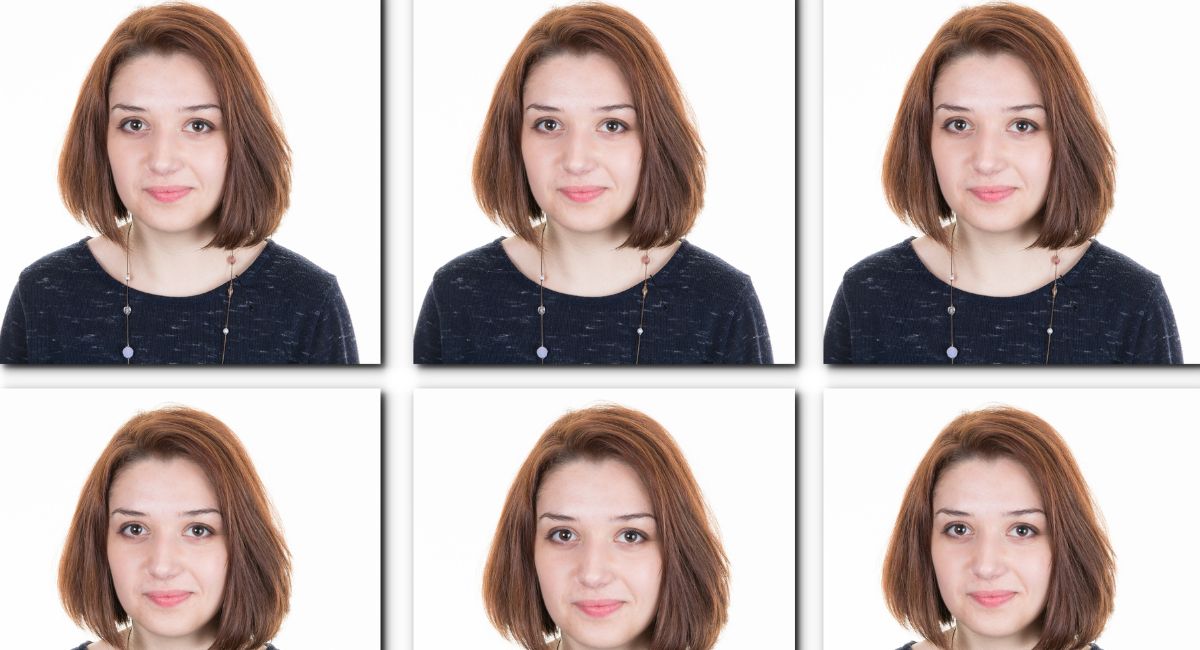
Step 1: Gather Your Tools and Materials
Begin your journey into self-expression by assembling the tools needed for this creative endeavor. Confirm that Adobe Photoshop graces your desktop and secure a high-resolution photo adhering to the nuances of an ideal ID picture—good lighting, a clear view of your face, and a backdrop that complements rather than distracts.

Step 2: Open Photoshop and Set Up Your Workspace
Embark on your creative journey by launching Adobe Photoshop and establishing a workspace that’s conducive to your vision. Set the canvas dimensions to the standard 2 inches by 2 inches at a resolution of 300 pixels per inch, ensuring the resulting image is not just personalized but also of professional quality.
Step 3: Import Your Photo
Introduce your chosen photo into the realm of Photoshop through the ‘File’ menu. This is the moment where your image begins its transformation. Take the time to carefully position your photo, ensuring that your face is the focal point and the overall composition aligns with your unique aesthetic.
Step 4: Crop and Resize
As the sculptor molds clay, use the Crop tool to trim your image to the ideal dimensions. This step is where the magic of symmetry unfolds—guides assist in maintaining balance, and resizing ensures that your visage fits snugly within the required parameters without distortion.
Step 5: Adjust Brightness and Contrast
Like a painter fine-tuning their masterpiece, delve into the nuances of brightness and contrast to enhance the overall quality of your photo. This step is pivotal in ensuring that your facial features emerge with clarity, meeting the stringent standards set for ID photos.
Step 6: Retouching (Optional)
For those seeking a touch of finesse, Photoshop’s retouching tools come into play. Blemishes dissipate, skin tones find equilibrium, and imperfections gently fade away. But, exercise restraint—a delicate touch preserves the authenticity that defines your unique charm.
Step 7: Background Cleanup
As a director frames a scene, curate the background of your photo. Utilize the Eraser tool or Background Eraser tool to remove distractions, or consider a background swap for a polished, professional finish.
Step 8: Add Text (Optional)
For the final brushstroke, consider adding text if needed. Your name or other pertinent details can find a place in a readable font, harmonizing with the overall composition without overshadowing the main subject—you.
Step 9: Save Your Work
As the curtain falls on your creative symphony, save your masterpiece in a format compatible with various platforms—JPEG or PNG, preserving the clarity and detail for seamless sharing and printing.
Step 10: Print and Test
Before your ID photo takes its place in the world, conduct a dress rehearsal. Print a test copy, ensuring the size and quality align with your expectations. Make any final adjustments, secure in the knowledge that your visual introduction to the world is a true reflection of your essence.
Conclusion
Congratulations on successfully navigating the terrain of Adobe Photoshop to craft a uniquely tailored ID photo. Beyond the standard requirements, you’ve imbued your image with personality and professionalism. This is not just a photo; it’s a visual manifesto—an introduction that speaks volumes before you utter a word. Feel free to experiment further with Photoshop’s myriad features, letting your creativity flow as you continue to present the world with the best version of yourself.